How a 3D Scanner Actually Works — Point Clouds, Triangulation, and the Light-Based Capture Pipeline
You have a leather chair you want to list on Etsy. A blueprint you need to modify in CAD. A prototype sitting on your desk that needs reverse-engineering. Or maybe you're an architect standing in a client's living room, trying to capture dimensions a tape measure and notebook can't convey. A 3d scanner solves every one of those problems — but only if you understand what it actually does.
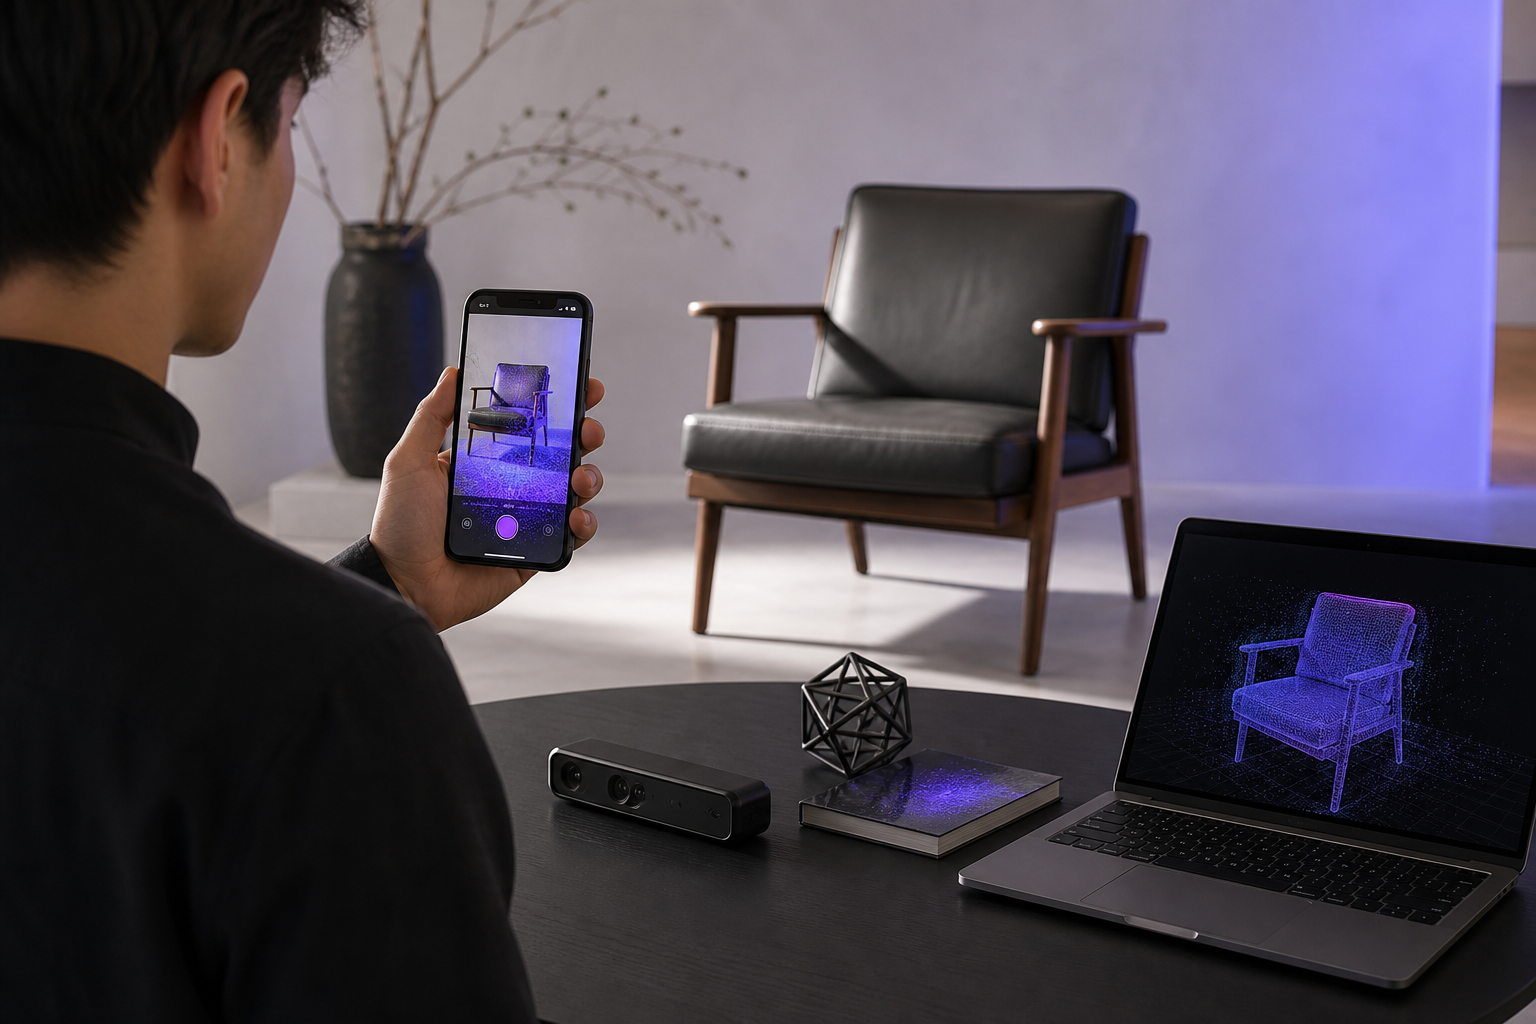
At the technical level, a 3d scanner is a device that captures the surface geometry of real-world objects or environments as millions of XYZ coordinate points, called a point cloud, which can then be converted into a mesh, exported as a CAD reference, or used directly for spatial analysis. That definition holds whether you're talking about a $50,000 metrology rig from ZEISS or the LiDAR sensor in the iPhone in your pocket, as Wikipedia's 3D scanning entry confirms across the technology spectrum.
A 3d scanner solves all of these problems — but only if you choose the right type and understand exactly what it captures, what it can't capture, and where your data actually goes.
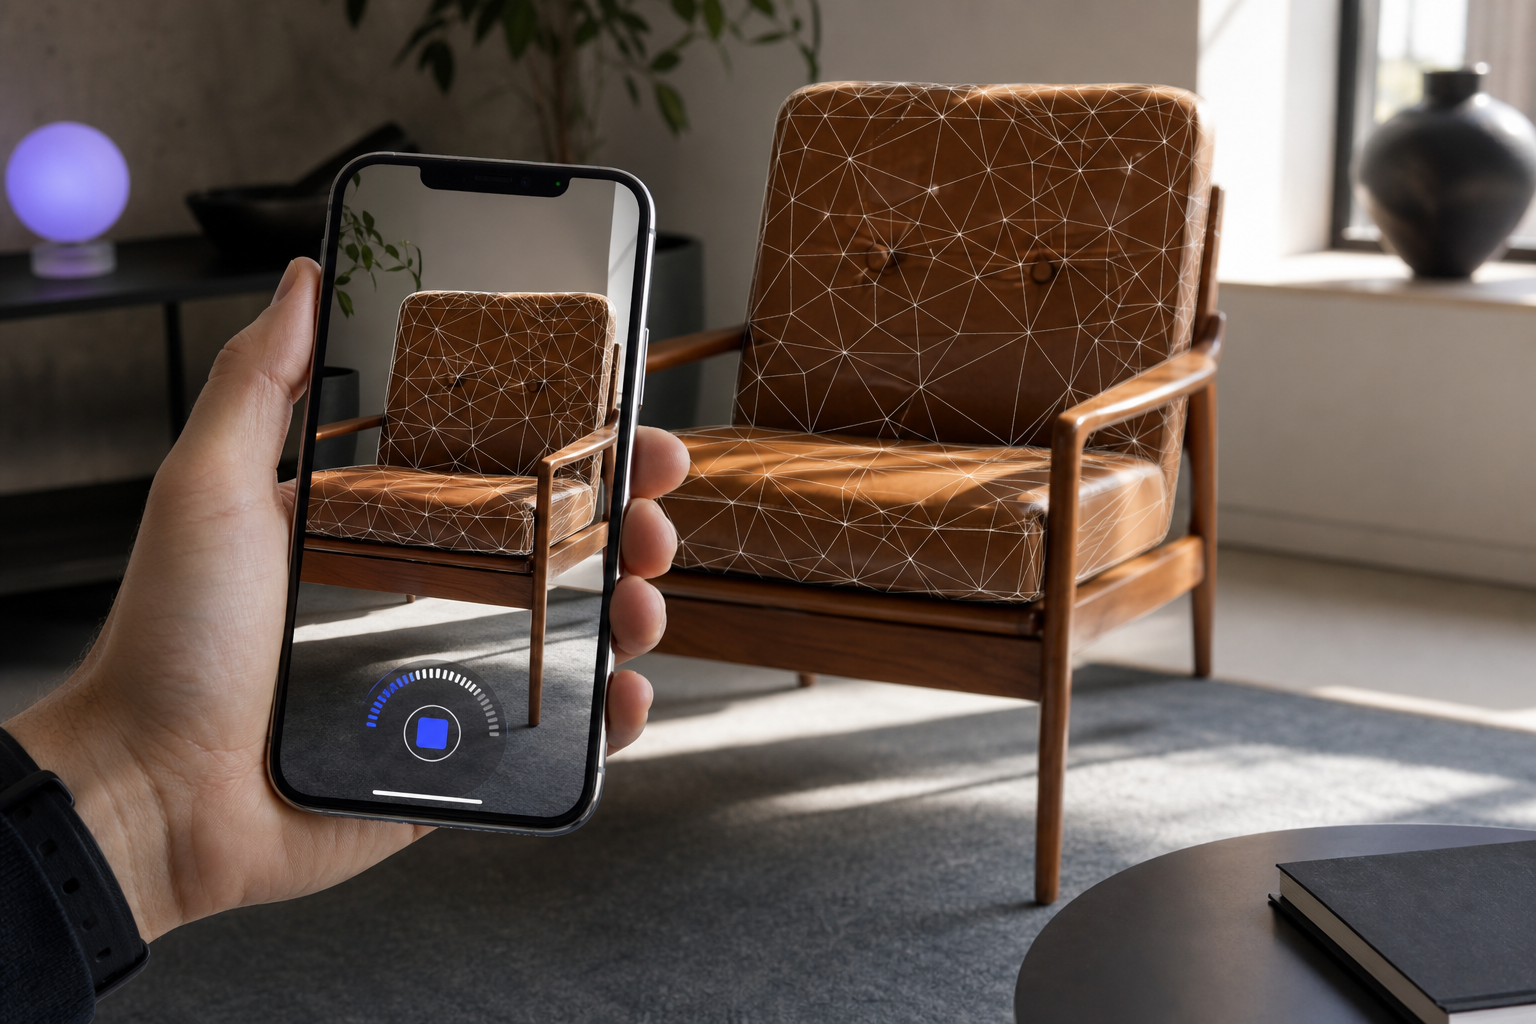
Table of Contents
- How a 3D Scanner Actually Works
- The Five Capture Modes
- Accuracy Bands and File Sizes
- Hardware Tiers Compared
- Export Formats Decoded
- On-Device vs. Cloud Processing
- What a 3D Scanner Cannot Do
- Your 8-Point Buying Checklist
Every 3d scanner, regardless of price or form factor, runs the same four-stage pipeline. The hardware differs. The physics doesn't.
Stage one is light projection or emission. The device casts something onto the target surface — structured-light scanners project shifting fringe or dot patterns, laser scanners sweep a single bright line, and LiDAR systems emit active infrared pulses. ZEISS describes the structured-light approach as a projector casting shifting fringe patterns onto the object surface, with cameras positioned at known offset angles. Whatever the light source, this stage is about putting a known signal onto an unknown surface.
Stage two is camera capture and deformation analysis. One or more cameras record how the projected pattern bends, stretches, or shifts as it lands on the surface. A fringe pattern looks straight on a flat wall and warped on a curved chair arm. That deformation isn't noise — it is the data. The camera is measuring how the surface distorts a known reference.
Stage three is triangulation to XYZ coordinates. Software converts that observed deformation into millions of discrete XYZ points using triangulation geometry. The math is straightforward in principle: given the known angle between the projector and camera, plus the observed pattern shift at any pixel, you can solve for the depth at that pixel. Repeat across the entire frame and you have a dense point cloud. ZEISS explicitly frames this triangulation step as the core technical operation that converts pattern distortion into precise spatial coordinates.
Stage four is mesh reconstruction. The raw point cloud is stitched into a continuous triangle mesh — the surface representation you can export as OBJ, STL, or USDZ and open in Blender, Rhino, or a 3D printing slicer. As the YouTube explainer "Watch this video before you buy a 3D scanner" walks through, this stitching step is where many scans fail visibly: holes, stray geometry, and ghost surfaces all originate at mesh reconstruction.
The scanner you choose isn't just about resolution — it's about whether your data lives on your device or travels to a server, whether you wait minutes or hours, and whether you export a mesh for 3D printing or point clouds for AI training.
That pipeline runs on three dominant technologies, each with distinct trade-offs.
Structured light uses the projector-plus-cameras setup ZEISS describes. It delivers the highest accuracy for object-scale captures and remains the dominant technology in industrial metrology. The trade-off is sensitivity to ambient light — direct sunlight washes out projected fringe patterns — and a limited working volume.
Laser line scanning sweeps a laser stripe across the surface while cameras track the line's deformation, converting those readings into XYZ points along the surface. It's accurate for industrial parts and handles reflective surfaces better than white-light structured systems, but it's slower and tends to cost more.
LiDAR (Light Detection and Ranging) uses active infrared time-of-flight or phase-shift measurement. It has a wider field of view, captures in real time, and handles room-scale spaces that structured-light systems struggle with. The YouTube explainer's infrared-vs-laser comparison is direct on the trade-off: LiDAR sacrifices some precision and sharp edge fidelity in exchange for speed, range, and on-device processing on mobile hardware. That trade-off is exactly why LiDAR has become the dominant smartphone scanning technology.
One distinction matters more than any other when reading spec sheets: resolution is not accuracy. Resolution describes how finely details are sampled — point spacing, triangle size, pixel density on the sensor. Accuracy describes how close those measurements are to ground truth. The YouTube explainer calls this "the accuracy fallacy" and it traps beginners constantly. A scanner can produce a visually dense, beautifully detailed mesh that is dimensionally wrong by 5 millimeters. Another scanner can produce a sparser mesh that is dimensionally accurate to a tenth of a millimeter. Resolution sells well in marketing. Accuracy is what determines whether your scan is usable.
The Five Capture Modes — Matching Output Format to Your Actual Use Case
Capture mode is the most overlooked decision in 3D scanning. It determines what file you walk away with — and choosing the wrong mode means re-capturing the entire scene from scratch. Beginners obsess over hardware specs and ignore the mode question, then discover after a 40-minute scan that the file format they need isn't an option in the app they used. The fix is to pick the mode before you pick up the device.
| Capture Mode | Output Format | Typical Use Case | Downstream Tool | Best Persona Match |
|---|---|---|---|---|
| Mesh | Textured OBJ / USDZ | Visualization, AR, 3D print prep | Blender, Rhino, Shopify AR | E-commerce, architects |
| Point Cloud | Colored PLY | Reverse engineering, surveying, datasets | CloudCompare, Open3D, MeshLab | Engineers, CV researchers |
| Pose+Video | HEVC + JSON pose data | NeRF training, SLAM, photogrammetry | Instant-NGP, COLMAP, Nerfstudio | Robotics & CV researchers |
| MultiCam | Synchronized PLY/OBJ from multiple devices | Large-space capture, complex geometries | Custom alignment pipelines | Architects, survey teams |
| Photogrammetry (image set) | JPG/HEIC stack | Texture-rich captures of static objects | RealityCapture, Metashape | Hobbyists, e-commerce |
Mesh mode is the workhorse for visual applications — e-commerce listings, architectural walkthroughs, game assets, AR product placement. ZEISS and Wikipedia both confirm that textured meshes are the default output for visualization-driven workflows because they bundle geometry and surface appearance into one file the downstream tool can render directly.
Point cloud mode is what CV/robotics researchers and reverse-engineering engineers actually need. Point clouds preserve raw spatial data without the lossy step of mesh reconstruction. That matters because mesh reconstruction is interpretive — it makes guesses about how to connect points into surfaces, and those guesses introduce error. For SLAM ground truth, NeRF training datasets, and dimensional reverse-engineering, you want the points themselves. ZEISS notes that dense point clouds with millions of XYZ samples are the standard for inspection-grade work.
Pose+Video mode is the niche but high-value mode: HEVC video paired with frame-accurate camera position and rotation metadata. This is essential for structure-from-motion pipelines, NeRF training, and SLAM benchmarking. The YouTube explainer's "tracking is everything" framing applies directly here — every frame needs accurate pose to align with neighbors, and exporting that metadata downstream is what makes research pipelines work. For researchers who need exporting frame-accurate camera pose data, this mode is non-negotiable.
MultiCam mode addresses a limitation single-device scans cannot fix: drift over long captures. Sensor noise, tracking failures, and accumulated alignment errors all compound across a large room or a complex object. Synchronizing multiple iPhones running simultaneous capture reduces drift by anchoring the reconstruction to multiple known viewpoints.
Photogrammetry mode uses an image stack rather than active depth sensing. It captures texture beautifully but requires controlled lighting and static subjects, and the compute happens offline.
Most competitor apps lock you into one or two modes. Choosing a scanner that supports all five — including dedicated outputs for neural radiance field reconstruction — future-proofs your workflow against the next pipeline you haven't built yet.
Accuracy Bands and File Sizes — What "Centimeter-Level Precision" Actually Means for Your Work
Spec sheets list numbers that mean nothing without context. "0.5 mm accuracy" sounds impressive until you realize it's the wrong band for room-scale capture and overkill for AR product placement. Translate the spec into "is this good enough for what I'm doing?" before you commit.
- Centimeter-level accuracy (1–3 cm) is the smartphone LiDAR band. This is the working precision of iPhone LiDAR-based scanners and what on-device apps deliver in real time. It is sufficient for architectural reference captures, scan-to-BIM workflows, e-commerce 3D product listings, and AR placement. It is not sufficient for CNC machining or precision part fabrication. ZEISS metrology framing combined with Formlabs' 3D printing guide both place fabrication-grade work well below this threshold.
- Sub-millimeter accuracy (0.1–0.5 mm) is the consumer and desktop handheld band. Handheld structured-light scanners from Revopoint, Shining 3D, and entry-level Artec units operate here. This is adequate for reverse-engineering moderately complex parts, prepping models for 3D printing, and capturing small mechanical components. Formlabs notes that meaningful 3D-printing workflows generally require accuracy in this band or better, and Revopoint's own application guide reinforces that consumer handhelds are positioned squarely for this use case.
- Metrology-grade accuracy (0.01–0.05 mm, or 10–50 microns) is the industrial band. Industrial structured-light and blue-laser systems from ZEISS, GOM, and Hexagon operate here. This level of accuracy is required for aerospace inspection, medical device quality control, and high-tolerance manufacturing. Price bands typically run $10,000 to $50,000 and above, consistent with the tiered breakdown in All3DP's scanner round-up.
- Point cloud density is not a vanity metric. Industrial structured-light systems routinely capture millions of points per frame, as ZEISS documents. Smartphone LiDAR captures tens to hundreds of thousands per frame. Density matters for downstream fidelity, but excess density inflates file sizes without improving useful accuracy. A point cloud with 50 million redundant points around a flat wall isn't more accurate — it's just slower to load.
- Textured mesh file sizes scale aggressively with resolution. A room-scale textured mesh can easily reach 300–500 MB at high texture resolution. That becomes a real distribution problem when an e-commerce seller is emailing product files to customers or an architect is sharing a captured space with a client viewing on a phone. Plan for decimation and texture compression as part of your standard workflow, not as an afterthought.
A 3D model that weighs 500 MB looks beautiful in a showroom but becomes a liability when you're emailing it to 100 customers. Know your distribution channel before you optimize for texture quality.
- Camera pose accuracy is a separate spec from mesh accuracy. A scanner can produce a beautiful mesh with poor pose data, which makes the capture useless for SLAM and NeRF pipelines even though it looks correct. As the YouTube explainer emphasizes in its tracking segment, researchers should evaluate pose accuracy independently from mesh accuracy — the two specs measure different things and degrade for different reasons.
Smartphone vs. Tablet vs. Desktop vs. Hybrid — Choosing the Right Scanner Hardware Tier
Scanner hardware sits in a budget, portability, and accuracy triangle. You can pick two of three. You cannot have all three at any price point, and anyone who tells you otherwise is selling marketing copy. The good news is that smartphone LiDAR has collapsed the entry point dramatically — what used to require a $2,000 minimum hardware investment in 2018 is now "the phone in your pocket plus a free app." The bad news is that the accuracy ceiling at the smartphone tier is real, and pretending otherwise leads to bad fabrication outcomes.
| Hardware Tier | Price Band | Accuracy | Portability | Best Persona |
|---|---|---|---|---|
| Smartphone LiDAR (iPhone 12 Pro+) | $0–$100 (app) | 1–3 cm | Highest | Architects, e-commerce, hobbyists |
| Tablet / iPad Pro LiDAR | $0–$200 + tablet | 1–3 cm | High | Architects, field surveys |
| Consumer handheld structured light | $500–$5,000 | 0.1–0.5 mm | Medium | Engineers, makers, 3D printing |
| Desktop / metrology-grade | $10,000–$50,000+ | 0.01–0.05 mm | None | QC labs, aerospace, medical |
| Hybrid (phone capture + desktop post) | $0–$500 (software) | Depends on capture | High in field | Pros wanting field-to-lab pipeline |
The smartphone LiDAR tier runs on iPhone 12 Pro and later, where the ARKit-accessible LiDAR sensor sits behind the rear camera array. Free or low-cost apps capture, process, and export entirely on-device. The advantage is real-time processing — mesh appears within seconds of stopping the capture. The limit is centimeter-level accuracy. Android LiDAR support is still emerging in 2026; a handful of flagship devices have time-of-flight sensors, but the software ecosystem lags iOS substantially.
The consumer handheld tier covers Revopoint POP, Creality CR-Scan, Shining 3D Einstar, and similar tethered structured-light units. Prices run $500 to $5,000 per the All3DP banding. Accuracy jumps an order of magnitude over smartphone LiDAR, but the device must be tethered to a laptop with enough compute to process incoming frames in real time. That tether is a workflow constraint as much as a technical one — you cannot walk a scan around a 5,000 square foot warehouse with a laptop in tow.
The desktop and metrology tier covers stationary structured-light rigs and high-end laser scanners. Price bands start at $10,000 and climb well past $50,000. Portability is zero — these systems live in calibrated rooms on factory floors or in inspection labs. The accuracy payoff is meaningful only when your application actually needs 10-micron precision.
Hybrid workflows are the pragmatic 2026 approach for most professionals. Use smartphone LiDAR for field capture, then move to desktop software — CloudCompare, MeshLab, RealityCapture — for alignment, decimation, and texture baking. This split puts portability where you need it (in the field) and compute where you can afford it (at the desk).
The hidden cost factor across all tiers is the subscription model. Many cloud-based scanners gate exports behind monthly fees. A "free hardware" scanner with a $20/month export subscription costs roughly $480 over two years, and roughly $1,200 over five years. Calculate true cost of ownership over a 24-month horizon before committing — the headline price is rarely the real price.
Export Formats Decoded — OBJ, USDZ, PLY, STL, and Why Format Choice Happens Before Capture
The most common rookie mistake is capturing first and worrying about format later. It works in reverse: the downstream tool dictates the format, the format dictates the capture mode, and you plan backwards from your final destination. Get this order wrong and you'll re-scan more than you'll publish.
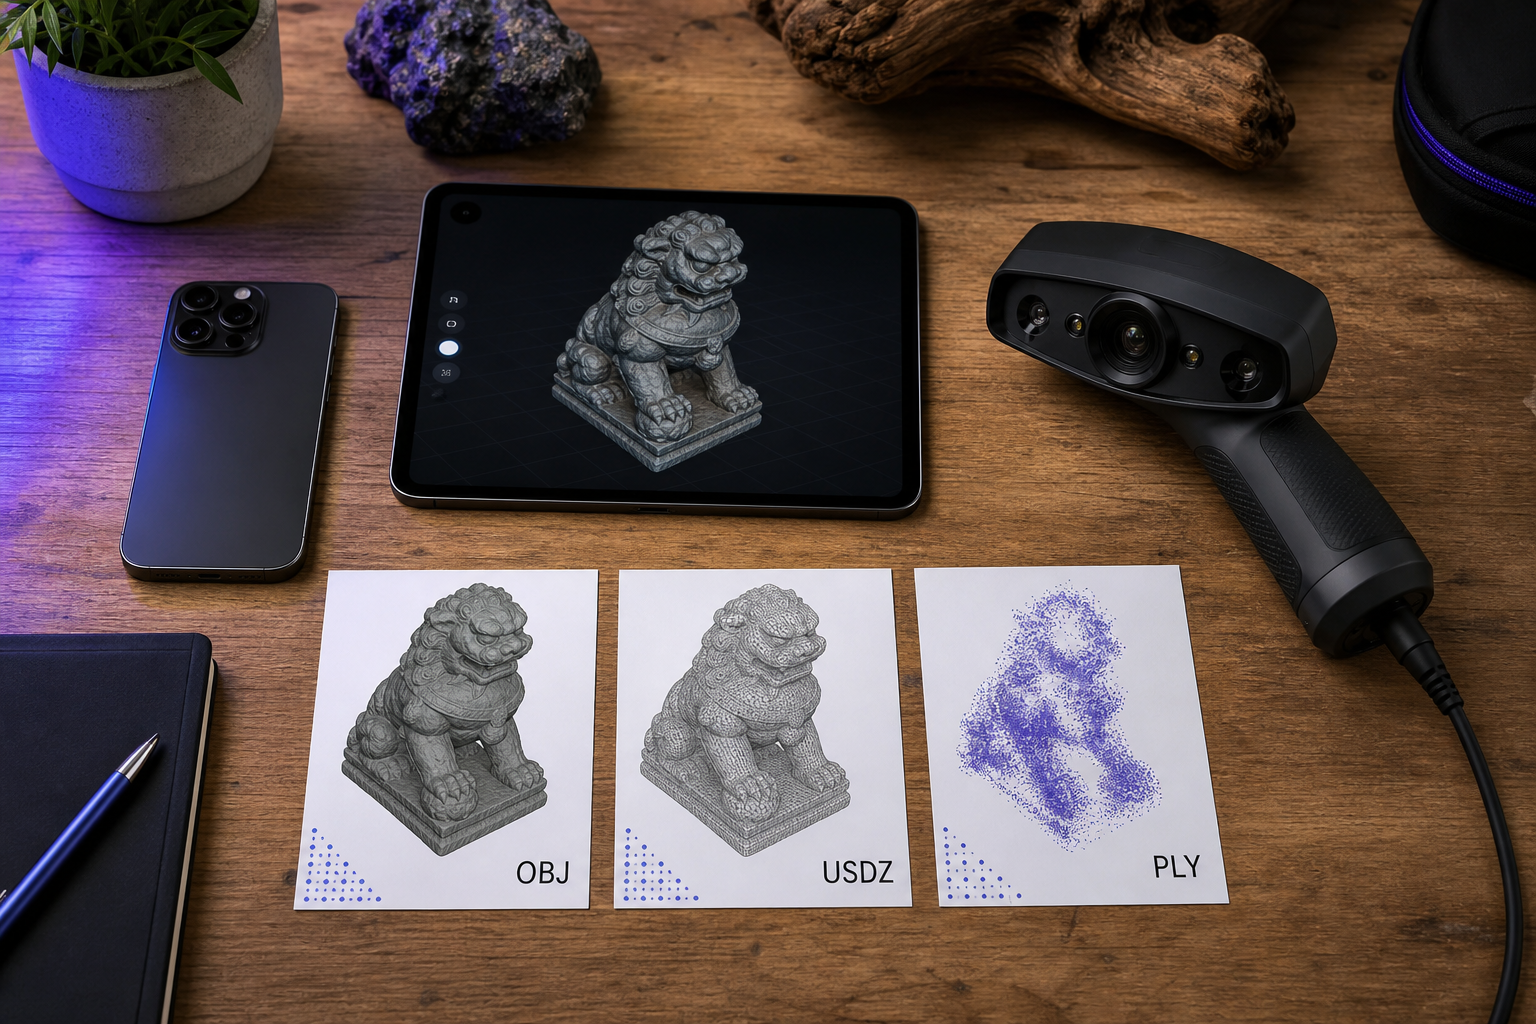
- OBJ + MTL (textured mesh, industry standard). Universal compatibility with Blender, Rhino, Maya, Cinema 4D, Fusion 360, and virtually every CAD or DCC tool. OBJ ships as paired files —
.objfor geometry,.mtlfor material reference, plus the texture image files themselves. Best for e-commerce 3D listings, architectural visualization, game assets, and 3D printing prep. The Revopoint application guide notes the format's universality. The caveat: OBJ is not a parametric CAD format. You cannot edit it as features or parameters. - USDZ (Apple's AR standard). Pixar's Universal Scene Description format, zipped into a single distributable file. Native AR placement on iOS and macOS, used by Shopify, Apple Quick Look, and the major AR commerce marketplaces. Textures are embedded in the file itself — no broken material references when you email a model to a client. Compact and optimized for mobile distribution. Best for e-commerce AR previews, marketing assets, and client demos on iPhone or iPad.
- PLY (Polygon File Format, point cloud standard). The format for raw point cloud data with per-point color (RGB) values. Used heavily by CloudCompare, Open3D, MeshLab, and COLMAP. Best for SLAM ground truth, NeRF training datasets, surveying work, and reverse-engineering reference. ZEISS describes the point cloud as the native output of dense capture systems, and PLY is how that data gets handed off. Not suitable for direct 3D printing — point clouds must be meshed first.
- STL (Stereolithography, 3D printing standard). Pure geometry, no color, no texture. Universal in 3D printing slicers — Cura, PrusaSlicer, Bambu Studio all consume STL natively. Best for fabrication, mechanical parts, and hobbyist 3D printing. Formlabs treats STL as the assumed handoff format throughout its scanner-for-printing guide. The critical limitation: STL discards color and material data entirely. Never export to STL if you need texture downstream — the information is gone, not hidden.
- HEVC video + JSON pose data (research pipelines). For SLAM, NeRF, photogrammetry research, and computer vision benchmarking. HEVC-encoded video frames paired with per-frame camera intrinsics, position, and rotation. Best for NeRF training in Instant-NGP and Nerfstudio, SLAM evaluation, and structure-from-motion pipelines. The YouTube explainer's emphasis on tracking accuracy underscores why exporting per-frame camera pose data matters: without accurate pose metadata, even high-quality video frames cannot reconstruct usable 3D scenes. This format is also the standard input pipeline for NeRF training workflows.
Not all scanners export all formats. Choose your scanner based on the downstream tool your team actually uses — not the format list on the scanner's marketing page.
On-Device vs. Cloud Processing — The Privacy, Speed, and Subscription Decision You Didn't Know You Were Making
Cloud processing in 3D scanning means something specific: the device captures raw sensor data, uploads it to a remote server, the server runs mesh reconstruction or photogrammetry compute, and returns a finished file to your device. You pay for that compute through a subscription, per-capture fee, or both. The trade-offs cascade across speed, privacy, internet dependency, cost, and long-term data ownership.

Speed is the first reality check. On-device LiDAR processing returns a finished mesh within seconds of stopping capture — the GPU on an iPhone 14 Pro or later handles the mesh reconstruction in near real time. Cloud-based photogrammetry uploads require 5 to 30 minutes of server compute per model, depending on settings and queue load, as the YouTube explainer and Revopoint's workflow notes both acknowledge. Desktop structured-light post-processing can run 1 to 4 hours for high-density scans. If you're capturing 30 product listings in a single afternoon, the difference between "seconds" and "30 minutes per scan" is the difference between finishing the work and not.
Privacy and intellectual property are the second issue, and the more serious one. An architect scanning a client's home is creating a detailed spatial record of a private residence — floor plans, furniture placement, security camera positions, the works. An R&D engineer scanning a prototype is creating a 3D record of unreleased IP. Cloud upload means that data resides on a third-party server, governed by the vendor's terms of service, subject to data breaches, subpoenas, and silent policy changes. For commercial work in regulated industries — defense contractors, medical device firms, GDPR-bound EU clients — cloud upload is often a non-starter at the procurement stage. Architectural spatial capture workflows for clients with NDAs frequently mandate on-device processing in the engagement contract itself.
Every scan uploaded to the cloud is a data point you no longer own. On-device processing means your captures — whether client spaces, product photos, or R&D prototypes — never leave your phone.
Internet dependency is the third issue. Cloud-based scanners are useless without connectivity. A site visit to a basement, a rural property, a factory floor with poor signal, a remote heritage site — all break the workflow. On-device processing works in airplane mode, in a Faraday cage, on a plane, in a tunnel. That isn't a niche concern. Field professionals encounter dead zones constantly.
The subscription cost math is the fourth issue, and it's where the headline price misleads. A "free hardware" scanner with a $15/month cloud processing subscription costs roughly $360 over 24 months. Over a five-year usage horizon, that "free" subscription scanner costs roughly $900 in recurring fees. A genuinely free on-device app eliminates this line item entirely. Audit any scanner's pricing page beyond the headline — read the export gate, the resolution gate, the watermark gate, and the storage gate. The free tier is almost never the tier that produces deliverable work.
Cloud lock-in is the fifth issue, and the one that bites longest. When mesh reconstruction lives on the vendor's server, your raw captures may not be exportable in their pre-processed form. If the vendor discontinues service, raises prices, changes terms, or simply removes a feature you depend on, your archive becomes inaccessible or unusable. You don't own a scan that lives in someone else's cloud. You rent it.
On-device processing isn't just faster. It's an architectural decision about who owns your spatial data. For professionals scanning client work, regulated environments, or proprietary geometry, on-device is the only defensible choice — not because the cloud is inherently bad, but because the trust assumptions cloud processing requires don't survive contact with real commercial liability.
What a 3D Scanner Cannot Do — The Limitations Marketing Pages Won't Tell You
Every honest beginner's guide must establish realistic expectations. Marketing implies "wave the scanner and get CAD." The reality is harder, and beginners who skip this section discover the gap on a deadline.
1. Scanners cannot see inside objects or through opaque materials. Optical scanning captures only what light can reach. Internal channels, hollow cavities, occluded geometry, and interior features of opaque parts are completely invisible to a scanner. As Revopoint's application guide states directly, CT scanning is the only modality that solves for internal geometry. If your reverse-engineering task requires capturing internal cooling channels in a cast metal part, no optical scanner — at any price — will help you.
2. Scanners do not produce CAD models. The output is a mesh or a point cloud, not a parametric, feature-based CAD body. Converting a scanned mesh into editable CAD geometry — a process called reverse engineering — requires dedicated software like Geomagic Design X, Fusion 360's mesh tools, or SOLIDWORKS ScanTo3D, plus significant manual work to identify features, fit primitives, and rebuild the design intent. The YouTube explainer's blunt framing captures the point: scanners are "a really fancy tape measure." They measure shape. They do not infer engineering.
3. Shiny, transparent, and very dark surfaces produce noisy or missing data. Reflective metals throw the projected light pattern off-axis. Glass transmits it. Black surfaces absorb it. All three break the assumption that the projected signal returns to the camera cleanly. The standard workarounds are matte scanning sprays — AESUB, Helling, and similar brands — that flash a thin coating onto the surface, or switching to blue-laser scanners that handle reflective surfaces better than white-light structured systems. Both Revopoint's guide and the YouTube explainer's "it's all about light" segment frame this as a hard physical limitation, not a firmware issue waiting to be patched.
4. Raw scans are never print-ready. Captured meshes contain noise, holes, stray geometry, and floating artifacts. Cleanup in MeshLab, Blender, or Meshmixer is mandatory before 3D printing or use in production. Budget 20 to 60 minutes of post-processing per scan for typical workflows — more for complex geometries or low-light captures. Revopoint's workflow guidance is explicit on this point: scans are starting material, not finished output.
5. Tracking failure causes drift, and drift kills scans. Scanners assemble a model by aligning successive frames using surface geometry, texture features, or fiducial markers. When tracking fails — flat featureless walls, repetitive patterns like brick or tile, fast camera motion, sudden lighting changes — frames misalign and the model warps. The YouTube explainer dedicates a full segment to this, framing tracking as the single highest-impact variable in scan quality. Marker-based tracking is the most reliable approach but requires placing physical fiducials on the subject ahead of time. There is no software fix that fully compensates for severe tracking failure.
A good scanner gives you geometry. A skilled operator turns that geometry into a usable model. The tool does not replace the workflow.
Your 8-Point Buying Checklist — How to Pick the Right 3D Scanner for Your First Project
This is the actionable filter. Run any candidate scanner through these eight questions before you buy.
- Name your primary deliverable in one sentence. "I need a textured 3D model of furniture for Etsy listings." "I need point cloud data of a warehouse interior for surveying." "I need camera pose data for NeRF training." If you cannot finish this sentence, you are not ready to buy. The deliverable dictates everything downstream — format, accuracy band, hardware tier, and capture mode.
- Map deliverable to required accuracy band. Centimeter-level for spatial capture, AR, and e-commerce. Sub-millimeter for fabrication and reverse engineering. Microns for QC and inspection. Pick the band, not the brand. Formlabs' accuracy guidance frames this trade-off in the context of 3D printing workflows, but the underlying logic applies to every downstream use case. Buying a metrology-grade scanner to capture sofas for AR is wasted budget. Buying a smartphone app to inspect aerospace parts is malpractice.
- Confirm the export format your downstream tool actually accepts. Open the import dialog of your CAD, Blender, Shopify, or Cura tool right now. List the accepted formats. Cross-reference against the scanner's export options. If they don't match, the scanner is wrong for you regardless of accuracy. This check takes five minutes and prevents a category of buyer's remorse that no return policy fixes. If your pipeline depends on pose data export for research workflows, verify the format and metadata structure before purchase.
- Check your hardware floor. iPhone 12 Pro or later for smartphone LiDAR apps — the older iPhone Pro models without LiDAR are not supported, regardless of how recent the iOS version is. Modern laptop with a discrete GPU for handheld scanner tethering — integrated graphics will choke on real-time frame processing. Dedicated workstation for desktop metrology systems. The Android LiDAR ecosystem is still maturing through 2026, with hardware support running ahead of software maturity.
- Calculate true 24-month cost of ownership. Hardware plus software plus subscriptions plus scanning spray plus cloud storage plus export gates. Compare a "free app plus $0/month" stack against a "free hardware plus $15/month subscription" stack over 24 months. The math frequently inverts the obvious choice — the "expensive" scanner with no recurring fees often beats the "free" scanner with a subscription on total cost.
- Test with a known reference object before scaling. Scan something with measured dimensions — a printed calibration cube, a piece of furniture you've physically measured, a CAD-designed part. Compare the scan to ground truth using calipers or a ruler. Most scanner apps are free to download. Exercise the free tier with real reference objects before committing time or money. This is the only way to verify spec sheet accuracy claims against your specific capture environment.
- Audit cloud dependency and data ownership. Read the terms of service. Where does captured data live? Who owns it? Can you export raw captures if you cancel? What happens to your archive if the vendor changes hands or shuts down? For client work, regulated industries, or proprietary R&D, choose on-device processing — the trust assumptions of cloud processing don't survive procurement review in regulated environments.
- Plan post-processing time into your workflow. Budget 20 to 60 minutes of cleanup per scan — hole filling, decimation, texture baking, mesh repair. Revopoint's application guidance reinforces that no scanner outputs production-ready meshes straight from the device, and the All3DP scanner round-up treats post-processing as a standard line item across every tier they evaluate. If your business model cannot absorb post-processing time at that rate, reconsider whether 3D scanning fits the workflow at all before you spend a dollar on hardware.