Point Cloud to Mesh: How to Convert Scans into Usable 3D Models
Why Your Point Cloud Isn't a 3D Model Yet
You finished the scan. The viewer shows a crisp, colored cloud rotating smoothly on your screen. Then you try to use it — and the point cloud to mesh gap swallows your afternoon. Drop the PLY into Blender and you get floating dots, not surfaces. Send it to a slicer and the import silently rejects it. Hand the file to a client expecting a Shopify AR model and they ask why nothing loads. The space between "completed capture" and "deliverable model" is where most scanning workflows stall, and it stalls in three predictable places: CAD and fabrication pipelines that demand watertight triangulated geometry, real-time and AR delivery channels that demand specific container formats, and research pipelines (NeRF, SLAM, photogrammetry) that often want the opposite of a mesh.
This article is a decision tree. You will leave knowing which conversion route to take, which output format your downstream tool actually wants, and how to validate the mesh before handoff. According to Grand View Research, the global 3D scanning market sits at roughly USD 4.28 billion in 2024 with a 10.1% CAGR projected through 2030 — meaning more practitioners than ever are hitting the point-cloud-to-mesh wall and looking for a working answer.

Table of Contents
- Five Reasons a Raw Point Cloud Fails in CAD, Slicers, and Game Engines
- On-Device, Desktop, or Cloud: Which Point-Cloud-to-Mesh Pipeline Fits Your Use Case
- Point Cloud to Mesh Inside Voxelio: A Capture-to-Export Walkthrough
- Poisson, Ball-Pivoting, and Alpha Shapes: Desktop Reconstruction for Engineers and Researchers
- Watertightness, Non-Manifold Edges, and Decimation: Post-Reconstruction Mesh Repair
- Use-Case-to-Format Decision Matrix: OBJ, USDZ, PLY, STL, and STEP
- Your Point-Cloud-to-Mesh Field Checklist: Scan, Convert, Repair, Ship
- Point Cloud to Mesh: Practitioner FAQ
Five Reasons a Raw Point Cloud Fails in CAD, Slicers, and Game Engines
Before you pick a conversion tool, identify which failure mode you're actually hitting. The five below cover roughly every case.
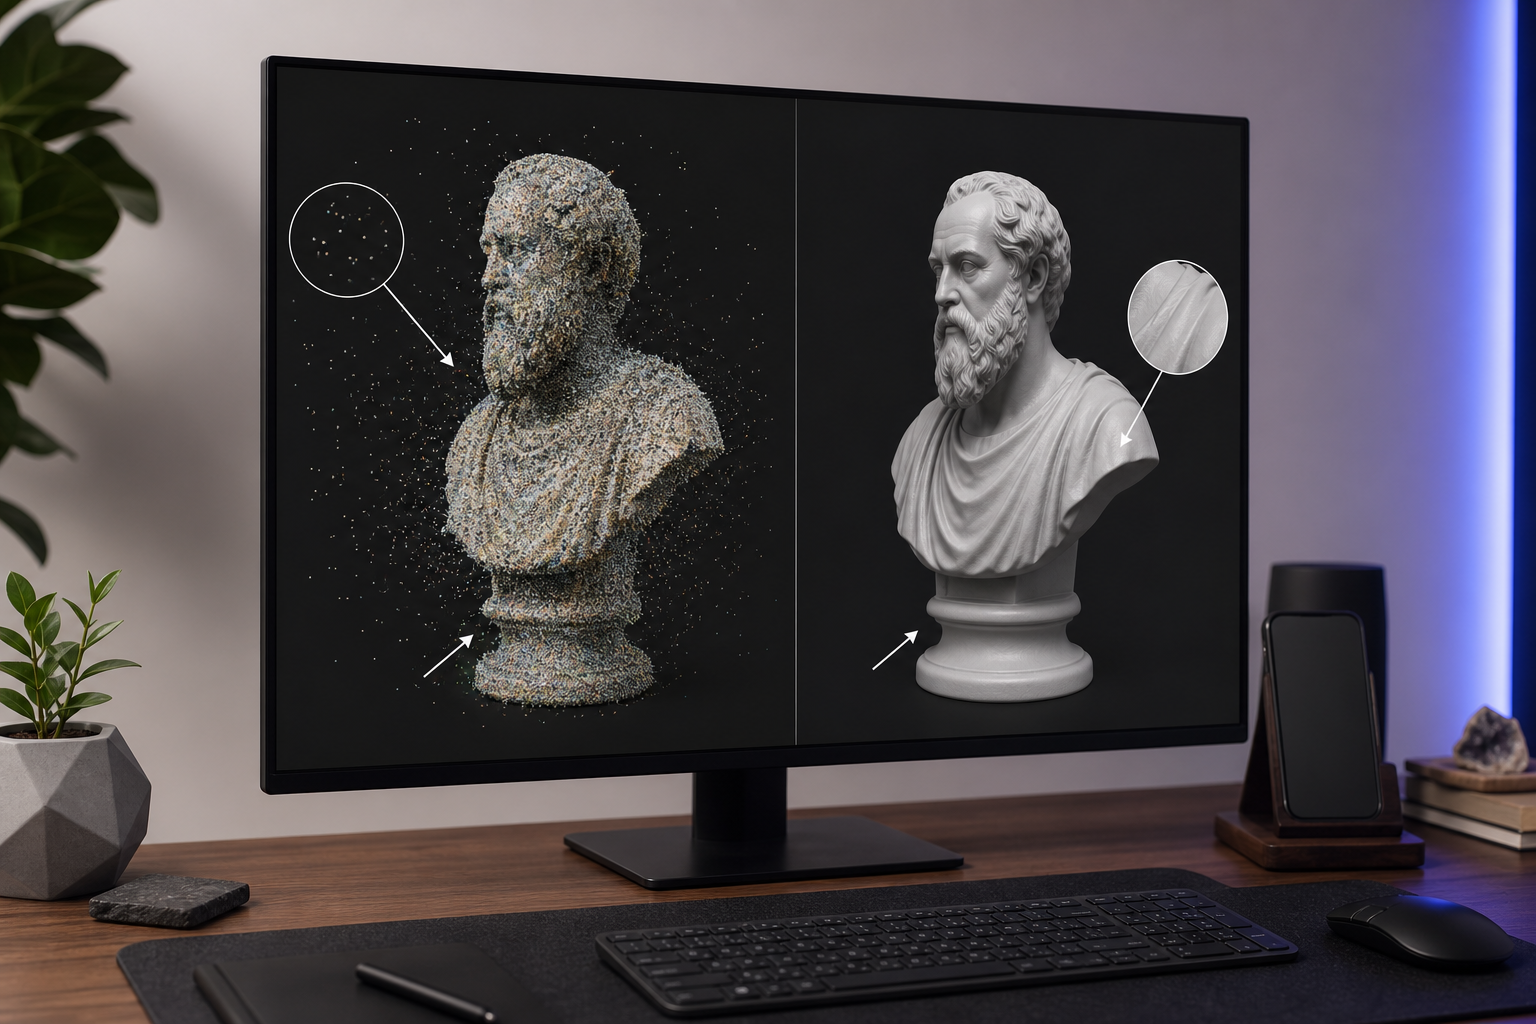
- No surface topology. A point cloud is a set of XYZ coordinates with optional color and normal attributes — nothing more. CAD tools (Fusion 360, SolidWorks), slicers (Cura, PrusaSlicer, Bambu Studio), and most game engines require a triangulated, watertight surface: connected faces enclosing a volume. The slicer has nothing to fill because there are no faces, only floating vertices. Hugues Hoppe's framing in the Poisson surface reconstruction paper makes the underlying problem explicit: scanner samples are nonuniform and noisy in both position and normals, which is why surface connectivity must be reconstructed, never assumed.
- File format incompatibility. PLY and PCD are research- and scanner-native containers. Shopify AR ingestion requires GLB or USDZ. Fusion 360 will not import PLY meshes natively. Unity expects FBX, OBJ, or GLB; Unreal expects FBX or USD. Even when a tool accepts PLY, it usually expects a PLY mesh, not a PLY point cloud — they share an extension but are structurally different objects, as the Open3D surface reconstruction tutorial makes clear by treating PLY as a first-class container for both.
- No UV mapping, no texture bake. Textures cannot be baked onto disconnected points. Baking requires a triangulated surface with UV coordinates. This kills e-commerce product visualization, architectural walkthrough deliverables, and any handoff where appearance matters as much as geometry. NeRF and SLAM pipelines often skip mesh conversion entirely for exactly this reason — they keep the radiance field or per-frame pose data instead of throwing it away during meshing.
- Scale and alignment drift. Raw clouds from separate passes do not auto-register. ARKit-captured clouds are in meters, but downstream tools may interpret them as millimeters or as unitless. Rhino users on community forums consistently report meshes that pass internal "naked edge" checks in one tool but fail in another, which confirms that interoperability — not just single-tool validity — is the real bar.
- Density isn't quality. A two-million-point cloud with noisy or misoriented normals reconstructs worse than a clean 200,000-point cloud. Hoppe's paper states this explicitly: noisy positions and scan misregistration mean dense ≠ accurate. A 2023 ScienceDirect article on point-normal orientation reinforces the same conclusion — wrong normals degrade Poisson and related algorithms regardless of how many points you fed in.
A point cloud is evidence of a space. A mesh is a model you can actually use. The conversion between them is where most scanning workflows either succeed or stall.
On-Device, Desktop, or Cloud: Which Point-Cloud-to-Mesh Pipeline Fits Your Use Case
Three pipelines dominate practical scan-to-mesh work, and they sort cleanly by who you are and what you ship.
| Method | Best for | Output formats | Texture bake | Offline capable |
|---|---|---|---|---|
| On-device ARKit reconstruction | Architects, e-commerce, real estate | OBJ, USDZ, PLY | Yes (keyframe baking) | Yes |
| Desktop open-source (MeshLab, CloudCompare, Open3D) | Engineers, CV researchers, custom pipelines | Poisson, BPA, Alpha → OBJ/PLY/STL | Manual UV + bake required | Yes |
| Desktop commercial (Geomagic, Rhino plugins) | Reverse engineering, metrology | STEP, IGES, OBJ, STL | Yes | Yes |
| Cloud pipeline (Polycam, Autodesk ReCap, Scaniverse) | Hands-off processing | GLB, OBJ, USDZ | Yes (server-side) | No |
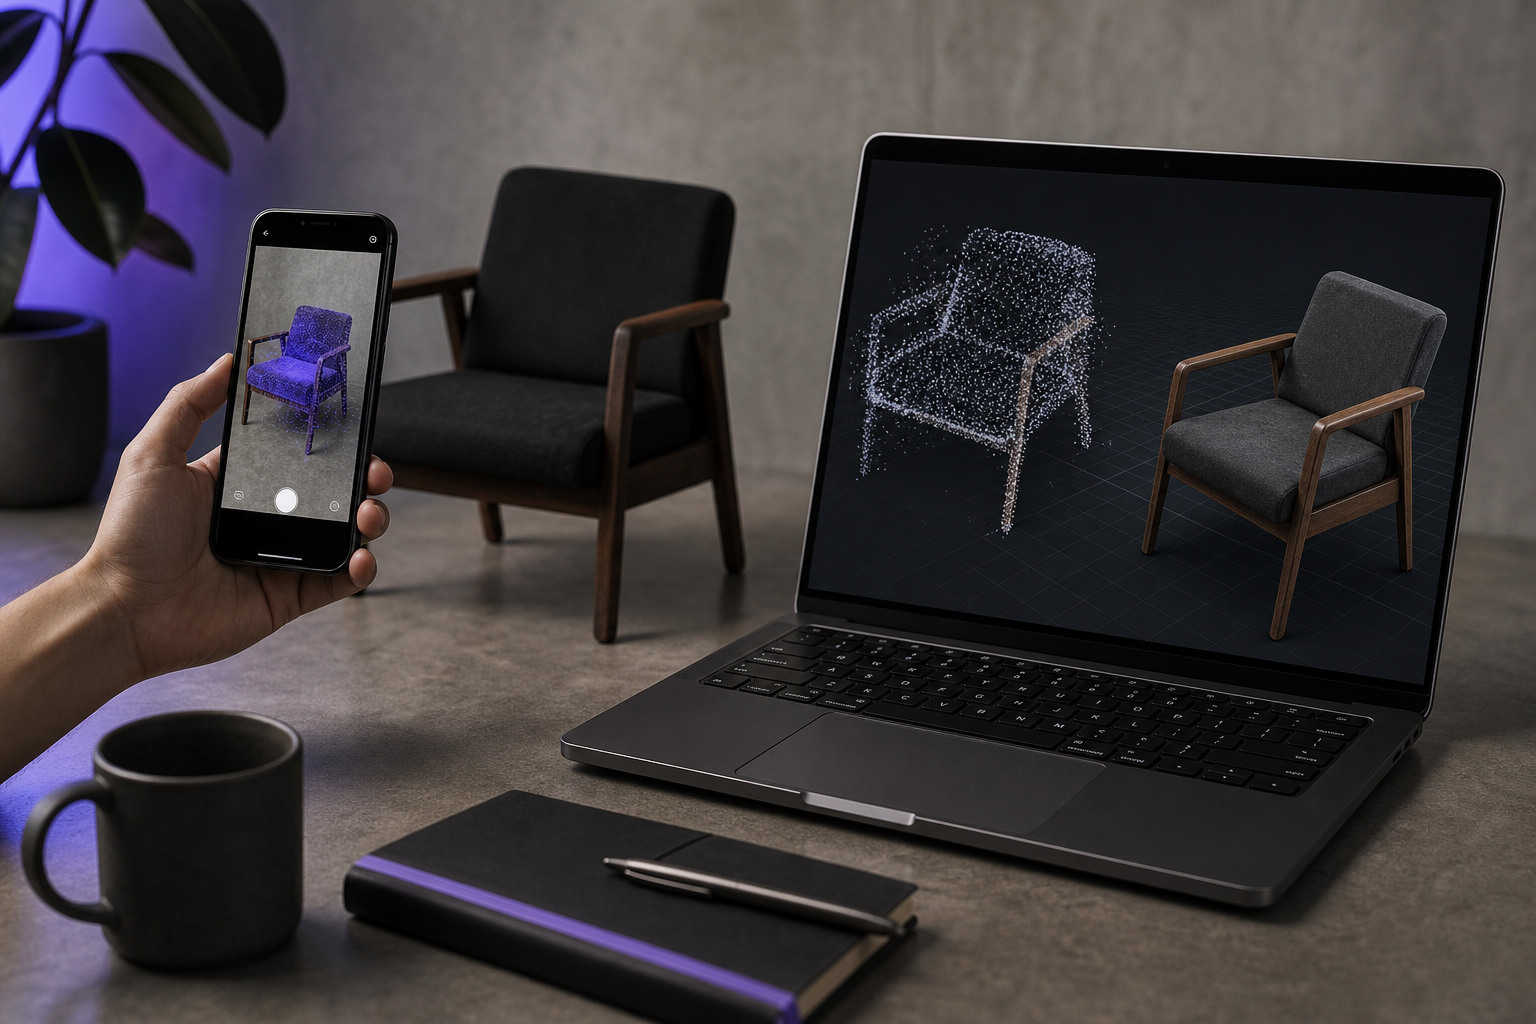
When "good enough fast" beats "perfect slow," the on-device path eliminates the entire point-cloud-to-mesh conversion step. ARKit-based Mesh mode in the best iPhone 3D scanner app for architects, makers, and e-commerce sellers produces a textured OBJ or USDZ as a direct output of the capture session — the point cloud and the mesh come from the same ARKit scene understanding, and you never see a PLY-to-mesh handoff in between.
For engineering, reverse engineering, or scientific work, the desktop route earns its complexity. You control outlier rejection thresholds, normal estimation parameters, octree depth, and decimation targets. The Open3D documentation maps directly to a scriptable pipeline: load → estimate normals → orient normals → Poisson → crop → decimate. The market data confirms this segmentation matters — Global Market Insights forecasts the 3D scanning market to reach USD 14.2 billion by 2034 at an 11.4% CAGR, with reverse engineering and quality inspection named as primary drivers.
The cloud path is a convenience trade. You pay monthly, you hand your captures to a third party, and you wait on server-side processing. For practitioners scanning confidential interiors, NDA-bound prototypes, or sensitive research data, that's a non-starter. For everyone else, the question is whether subscription convenience outweighs the on-device alternative — which, for most architectural and e-commerce work, it does not.
Point Cloud to Mesh Inside Voxelio: A Capture-to-Export Walkthrough
If your destination accepts OBJ or USDZ, the fastest point cloud to mesh workflow is to skip the conversion entirely by capturing the mesh in the first place. The walkthrough below assumes an iPhone 12 Pro or later with LiDAR.
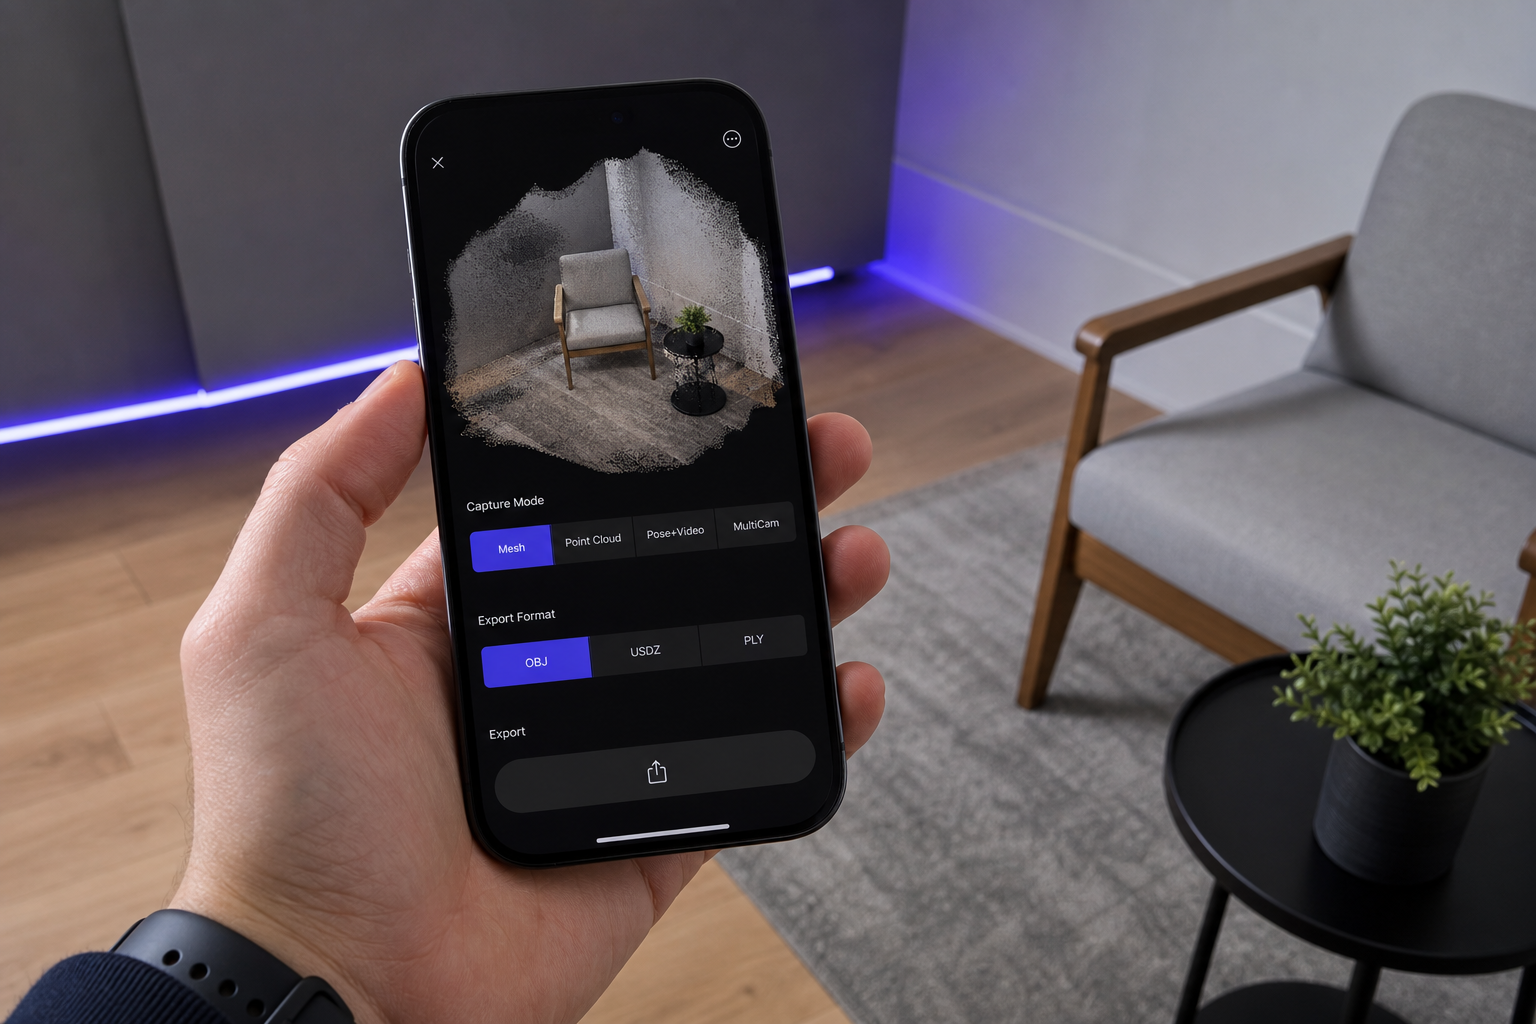
- Pick the capture mode that matches your output target. Mesh mode produces a textured OBJ or USDZ as the direct output — ARKit's scene mesh is reconstructed in real time and texture-baked from keyframes. Point Cloud mode produces a colored PLY when you need raw data for an external pipeline (NeRF training, SLAM ground truth, custom reconstruction). Pose+Video mode produces HEVC video with frame-accurate camera poses for photogrammetry or neural radiance field training. MultiCam captures synchronized streams when you need multiple viewpoints. The decision rule is simple: if your downstream tool accepts OBJ or USDZ, choose Mesh mode and skip the conversion step.
- Set scan density before you start. Density controls vertex spacing in the resulting cloud or mesh. Higher density means larger files and more memory pressure on older devices. Lower density means faster reconstruction with coarser geometry. The practitioner rule-of-thumb: for AR and real-time delivery, target meshes in the tens of thousands of triangles. For visualization or reverse-engineering inputs, hundreds of thousands are justifiable if downstream tools handle them comfortably.
- Capture with discipline. Move slowly and steadily — ARKit's mesh reconstruction degrades when frames blur. Maintain roughly 30–40% overlap between sweeps so the mesh stitches cleanly across passes. Walk around objects rather than rotating the device in place; rotational capture starves the parallax that LiDAR depth fusion depends on. Avoid backlit surfaces, pure black materials, and high-gloss finishes, which ARKit's depth estimation handles poorly. Watch the live mesh preview while you scan — coverage gaps are easier to fix in the field than in post.
- Export to the format your destination wants. OBJ ships as the mesh plus a companion MTL file plus the texture image files; it is the universal compatibility target for desktop tools, game engines, and renderers. USDZ ships as a single-file AR delivery for iOS, Shopify, and Apple Quick Look — no separate textures, no broken references. PLY ships as a colored point cloud for research pipelines that want raw spatial data. Choose at export, not during capture; the capture session contains enough information to support all three.
- Verify the export before handoff. Open the OBJ in a viewer — Preview on macOS, an online glTF viewer, or Blender — and confirm texture coverage is complete, the surface is closed where you expect it to be, and the scale matches reality. ARKit captures in meters; if the destination tool interprets units differently, your model will arrive 1,000× too small or 1,000× too large. If the file is bound for a slicer or CAD package, the validation steps in the next two sections apply before you send it onward.
Poisson, Ball-Pivoting, and Alpha Shapes: Desktop Point-Cloud-to-Mesh Reconstruction for Engineers and Researchers
When you need control — over noise thresholds, normal estimation, octree depth, or decimation targets — the desktop path is the only path. The algorithm choice depends on the geometry you are reconstructing, but the preprocessing matters more than the algorithm.
Preprocessing — the step most tutorials skip. The standard sequence drawn from both Hoppe's Poisson paper and the Open3D tutorial is non-negotiable: remove gross outliers and noise, downsample to uniform spacing, estimate normals, orient normals consistently, then run reconstruction. Hoppe's paper notes explicitly that scanner samples are nonuniform and that "both positions and normals are noisy due to sampling inaccuracies and scan misregistration" — which is why integrating over the full oriented point set (Poisson's approach) outperforms local-connectivity approaches on real-world scan data. Skip the preprocessing and the reconstruction inherits every defect of the raw cloud.
Poisson Surface Reconstruction. Best for smooth organic shapes — rooms, terrain, furniture, sculptural objects. The algorithm solves a Poisson equation over an adaptive octree (Kazhdan, ACM TOG 2006) and produces watertight surfaces even when the input is incomplete. Oriented normals are a hard precondition; without them the algorithm receives garbage and produces garbage. The single parameter that matters most is octree depth: 8–10 for objects gives you fine surface detail at the cost of memory; 6–8 for rooms or larger environments yields coarser detail with manageable memory. In Open3D, the call is o3d.geometry.TriangleMesh.create_from_point_cloud_poisson(pcd, depth=9). The output typically needs cropping (Poisson extends surfaces beyond the input bounds, creating bubbles around occlusion gaps) and decimation to reach a target triangle count.
Poisson reconstruction doesn't care how many points you gave it. It cares whether those points had clean, consistently oriented normals. Skipping noise removal and normal orientation is the most common reason a dense scan produces a worse mesh than a sparse one.
Ball-Pivoting Algorithm (BPA). Better for engineering parts with sharp edges and well-defined planar surfaces — brackets, fixtures, mechanical assemblies. BPA does not interpolate over noise the way Poisson does. It connects existing points by rolling a virtual ball across the cloud, so gaps in the cloud become gaps in the mesh. BPA is highly sensitive to point density and uniformity; aggressive noise cleaning and uniform downsampling are required upstream. Choose BPA over Poisson when preserving crisp edges matters more than guaranteed watertightness, and accept that you will need to patch holes manually afterward. Industrial metrology workflows where commercial scanners like GOM 3D scanning systems and their modern alternatives dominate often default to BPA-style approaches for the same reason — sharp-edge preservation wins.
Open3D for scripted pipelines. When you are building a NeRF preprocessing chain, a SLAM evaluation harness, or batch reconstruction over hundreds of scans, Open3D's Python API is the answer. The canonical workflow reads as five calls: pcd = o3d.io.read_point_cloud("scan.ply") → pcd.estimate_normals(...) → pcd.orient_normals_consistent_tangent_plane(k=30) → mesh, densities = o3d.geometry.TriangleMesh.create_from_point_cloud_poisson(pcd, depth=9) → density-based cropping → o3d.io.write_triangle_mesh(...). Both estimate_normals and orient_normals_consistent_tangent_plane are non-optional preconditions for Poisson; the Open3D tutorial documents this explicitly. The point that bears repeating: garbage in, garbage out is not a metaphor here. It is the algorithm's documented failure mode.
Alpha Shapes. Useful for 2.5D extraction — architectural floor plans, terrain envelopes, occupancy bounds. The method defines a surface by the alpha-radius rolling around the cloud, tunable from convex hull (very large alpha) at one extreme to fine concave detail (small alpha) at the other. Alpha shapes are not a general-purpose reconstruction method. Treat them as a specialist tool for footprint and envelope extraction, not as a replacement for Poisson or BPA on volumetric objects.
Why dense scans still fail. The counter-evidence from Hoppe and from the 2023 point-normal orientation research lines up: reconstruction quality is dominated by normal correctness and noise floor, not by point count. Practitioners blaming "the wrong file format" usually have a normals or noise problem upstream that no format change will solve. If you have run Poisson three times and the mesh keeps coming out bubbly, the answer is not depth 11. The answer is upstream cleaning and normal orientation.
Watertightness, Non-Manifold Edges, and Decimation: Post-Reconstruction Mesh Repair
A reconstructed mesh is not automatically a deliverable mesh. The five-step checklist below covers the repair sequence that the slicer or CAD tool actually requires.
- Run an automated manifold and watertight inspection first. Use Meshmixer's Inspector, Blender's 3D Print Toolbox (the Mesh Analysis tab), or Netfabb. Non-manifold geometry is invisible in a standard shaded viewport but causes slicer rejection or unexpected infill and webbing artifacts. The Homestyler 3D-printing guide defines the requirement precisely: a watertight mesh has no naked edges, no T-junctions, and no edges shared by more than two faces. Critically, "watertight" is an interoperability constraint, not a single-tool flag. Rhino users consistently report meshes that pass internal naked-edge checks but still fail in slicers — you need to validate in the destination tool, not just the source.
- Fill holes — but know when auto-fill destroys geometry. Small holes from occlusion gaps (under the rim of a bowl, behind a chair leg) are safe to auto-patch. Large holes spanning structural features are not. The algorithm bridges flat planes across what should be a curved cavity, and the resulting "repaired" surface is a lie about the captured object. For engineering parts, repair holes manually using bridge or extrude-loop operations. A Reddit 3D-printing thread on struggling to make car surface meshes watertight documents this failure mode at length — automated repair introduces subtle distortions, bridging gaps or collapsing thin features that matter in engineering contexts.
- Decimate without losing dimensional accuracy. Blender's Decimate modifier (Collapse mode, ratio 0.3–0.5 as a starting point) reduces triangle count while preserving the silhouette. Community repair workflows confirm that simplifying overly dense meshes often improves slicing reliability without visible surface loss. Target triangle counts by application: AR and real-time delivery (USDZ, GLB) 20K–80K triangles; visualization and rendering 100K–500K; reverse engineering and metrology retain full density and decimate only at the final export; FDM 3D printing 50K–200K is usually sufficient because printer resolution caps the meaningful detail anyway.
- Pick the export format by destination, not by habit. STL for fabrication (encodes only triangle geometry — no color, no units — but the de facto standard for FDM and resin slicing). OBJ + MTL for textured rendering, game engines, and any pipeline needing materials. USDZ for iOS AR, Shopify AR, and Apple Quick Look. STEP or IGES for CAD reverse engineering, which requires converting the mesh to a parametric or B-rep surface via a tool like FreeCAD, Fusion 360's Mesh-to-BRep workflow, or Geomagic Design X. The format you pick determines what the receiving tool can actually do with the model.
- Verify scale before fabrication or simulation. ARKit captures in meters. STL and OBJ are unitless — the slicer or CAD tool assigns units on import, and the default may not match what you exported. Confirm a known dimension (a door frame width, a ruler placed in scene, a fiducial marker) before sending the file to a CNC mill, slicer, or simulation. Then run a final naked-edge check in the destination tool itself. Cross-tool validation is the de facto standard before fabrication for a reason: passing one tool's check guarantees nothing about the next tool's behavior.
Use-Case-to-Format Decision Matrix: OBJ, USDZ, PLY, STL, and STEP for Point-Cloud-Derived Meshes
Format choice is a commitment. The matrix below maps the seven most common downstream use cases to the format that survives them.
| Downstream use case | Recommended format | Texture support | Common accepting tools |
|---|---|---|---|
| FDM / resin 3D printing | STL | No | Cura, PrusaSlicer, Bambu Studio, Chitubox |
| AR product viewing (iOS, Shopify, web) | USDZ | Yes | Quick Look, Shopify AR, Adobe Aero |
| Game engine import | OBJ + MTL or FBX | Yes | Unity, Unreal, Godot |
| CAD reverse engineering | STEP / IGES (from mesh) | No | Fusion 360, SolidWorks, FreeCAD |
| NeRF / SLAM / photogrammetry research | PLY + Pose+Video | Per-vertex color | Open3D, COLMAP, instant-ngp, Nerfstudio |
| Client visualization | OBJ + MTL or GLB | Yes | Blender, KeyShot, web viewers |
| Architectural BIM handoff | OBJ (re-modeled in Revit) | Yes | Revit (context model), Rhino |
Three of these choices deserve specific explanation because practitioners routinely pick them wrong.
USDZ is underused by non-Apple professionals. It packages mesh, textures, and materials into a single file, opens natively on iOS, embeds cleanly in Shopify product pages, and previews in Apple Quick Look without a separate viewer app. The only reasons not to choose USDZ for AR or web delivery are (a) non-Apple-first audiences that specifically require GLB instead, and (b) workflows that need editable separate texture files. For most e-commerce and architectural deliverables, USDZ is the cleaner output by a wide margin.
OBJ + MTL still beats GLB for most desktop tools despite GLB being the more modern container. OBJ is universally supported across CAD, rendering, and DCC software with predictable material handling. GLB is the right choice for web-first delivery (three.js, model-viewer, web AR), but for desktop pipelines OBJ + MTL is the fewer-surprises option. Game engines accept both; the difference shows up in materials and texture compression behavior.
Keep the PLY when you don't yet know what the model will become. For NeRF 3D scanning and neural radiance field workflows, SLAM evaluation, or photogrammetry, the colored point cloud plus camera pose data is more valuable than a meshed version — meshing throws away exactly the structure these pipelines exploit. Pose+Video mode pairs HEVC video with frame-accurate camera poses, which is the input modality NeRF pipelines like instant-ngp and Nerfstudio expect. Open3D's PLY-centric workflow confirms PLY's status as the research-default container.
For 3D printing, OBJ-to-STL is a one-step conversion, but it's where scale verification matters most. STL discards units entirely. Confirm dimensions in the slicer's preview before sending the file to the printer, or you will discover the problem 18 hours into a print.
The format you export is a commitment. OBJ travels everywhere but carries baggage. USDZ is cleaner than most professionals realize. PLY is the format you keep when you're not yet sure what the model will become.
Your Point-Cloud-to-Mesh Field Checklist: Scan, Convert, Repair, Ship
The checklist below is the practitioner reference for the next scan. The stages reflect both the Hoppe and Kazhdan reconstruction prerequisites and the slicer-validation guidance from 3D-printing practice. Read it once before the capture, then again before the handoff. If you are using ARKit Mesh mode for an AR or visualization deliverable, Stages 1–3 and 5 are sufficient — Stage 4 only applies when the pipeline requires desktop reconstruction.
| Stage | Action / Threshold |
|---|---|
| Stage 1 — Before You Scan | Choose Mesh mode if output is OBJ/USDZ; Point Cloud mode for PLY research output; Pose+Video for NeRF/SLAM |
| Set scan density: lower for AR/real-time, higher for reverse engineering | |
| Check lighting: avoid backlit, glossy, or pure-black surfaces (ARKit depth degrades) | |
| Confirm iPhone 12 Pro or later for LiDAR-assisted capture | |
| Stage 2 — Capture | Move slowly and steadily; motion blur degrades ARKit mesh reconstruction |
| Maintain ~30–40% sweep overlap between passes | |
| Walk around objects rather than rotating the device in place | |
| Verify coverage in the live mesh preview before ending the session | |
| Stage 3 — Export | OBJ for desktop tools, game engines, and most pipelines |
| USDZ for iOS AR, Shopify, Apple Quick Look | |
| PLY for research pipelines (NeRF, SLAM, photogrammetry) | |
| Confirm scale: ARKit captures in meters | |
| Stage 4 — Desktop Processing (if required) | Remove outliers and downsample to uniform spacing |
Estimate normals (estimate_normals) and orient them (orient_normals_consistent_tangent_plane) | |
| Poisson at depth 8–10 (objects) or 6–8 (rooms); BPA for sharp-edged parts | |
| Crop Poisson output to original cloud bounds; decimate to target triangle count | |
| Stage 5 — Pre-Handoff Validation | Run automated manifold check (Blender 3D Print Toolbox, Meshmixer Inspector) |
| Confirm naked-edge count = 0; cross-validate in the destination tool | |
| Decimate to use-case target: 20K–80K (AR), 100K–500K (visualization), 50K–200K (FDM) | |
| Verify dimensions on a known feature before slicer, CNC, or simulation | |
| Final export in destination format; confirm texture references resolve (OBJ + MTL + texture files co-located) |
Point Cloud to Mesh: Practitioner FAQ
Can I convert a PLY point cloud to a mesh without any desktop software?
Yes, by capturing in Mesh mode rather than Point Cloud mode in the first place — ARKit-based reconstruction produces a textured OBJ or USDZ as the direct output of the capture session, eliminating the conversion step entirely. If you already have a PLY and need a mesh without installing desktop tools, browser-based converters exist but quality is limited and you lose control over noise filtering, normal orientation, and reconstruction parameters — all of which matter, as the Poisson paper documents. For production work, recapture in Mesh mode using a workflow like Voxelio's iPhone 3D scanning approach rather than relying on post-hoc PLY-to-mesh conversion through a black-box web tool.
How dense does a point cloud need to be for a clean Poisson reconstruction?
Density matters less than uniformity and normal quality. Hoppe's foundational work emphasizes that Poisson integrates over the full point set and tolerates non-uniform sampling well, provided normals are clean and consistently oriented. As a practical target, aim for point spacing roughly equal to or smaller than your desired mesh feature resolution — if you want 5mm feature detail, you want median point spacing under 5mm. Octree depth 8–10 in Poisson handles object-scale captures comfortably; 6–8 fits rooms or larger environments. Doubling density without cleaning noise typically produces a worse mesh, not a better one.
Will a mesh exported from ARKit Mesh mode pass STL validation for FDM printing without repair?
For many object captures the OBJ-to-STL output is usable directly — ARKit's mesh reconstruction produces closed surfaces in most cases. But "watertight in one tool" doesn't guarantee slicer acceptance: Rhino users and 3D-printing communities consistently report cross-tool discrepancies, and the Homestyler guide on non-manifold edges documents the failure modes clearly. Always run a manifold check in Blender's 3D Print Toolbox or Meshmixer's Inspector, patch any non-manifold edges manually rather than trusting auto-fix on structural features, decimate to 50K–200K triangles, and confirm dimensions against a known reference before printing. Skipping the check works until the day it doesn't — usually 14 hours into a long print.