What Makes a Great 3D Scanning Studio? Setup, Tools, and Best Practices
You've decided to bring 3D capture in-house. Maybe you're tired of paying $500–$2,000 per outsourced scan to a service bureau that takes four business days to return a file. Maybe a client expects same-day turnaround on as-built documentation or product photography. Maybe you're building a pipeline that needs to ship hundreds of consistent assets — same geometry tolerance, same texture treatment, same export format — week after week.
Whatever the trigger, the next discovery is uncomfortable: the gap between "I own an iPhone with LiDAR" and "I run a 3d scanning studio that ships reliable assets daily" is wider than buyers expect. It's not a hardware problem. The phone in your pocket is more capable than the $40,000 laser scanner of a decade ago. The problem is spatial design, workflow discipline, and tool selection — three decisions you make before you ever press capture.
This guide walks the six choices that separate a chaotic scanning corner from a studio that scales: room geometry, lighting strategy, the hardware-and-software stack, the repeatable capture workflow, geometry-and-texture quality control, and the eight mistakes that quietly kill throughput in the first six months.
Table of Contents
- Spatial Design: Why Room Geometry Determines Scan Quality Before Gear Does
- Lighting Strategy: How to Engineer Consistency Across Every Capture
- Hardware & Software Stack: Building the 3D Scanning Studio Toolchain
- The Repeatable Capture Workflow: A 10-Step Process for Daily Scanning
- Geometry and Texture Quality: Engineering Decisions That Eliminate Post-Processing
- Eight Studio Mistakes That Kill Scan Quality — And the Fixes That Prevent Them
Spatial Design: Why Room Geometry Determines Scan Quality Before Gear Does
Gear gets blamed for bad scans. The room is usually the culprit. ARKit, structured light, and time-of-flight sensors all fail in predictable spatial conditions, and no software fix recovers what the environment destroyed at capture time. If your wall is glossy, your floor is reflective, and your operator is bumping a tripod with their elbow every fourth scan, the difference between a $50 mobile app and a $50,000 metrology system is roughly nothing — both produce drift, holes, and unusable geometry.
Five spatial variables drive scan quality, in approximate order of impact.
Room dimensions and ceiling height. A working 3d scanning studio wants a minimum 12×12 ft (3.6×3.6 m) capture footprint with 8–10 ft ceilings. Smaller rooms force operators too close to subjects — iPhone LiDAR depth sensors saturate below roughly 0.3 m, returning invalid data on the surface you most need. Larger rooms introduce light falloff and tracking drift across the longer transit paths an operator walks during a single pass. According to vendor documentation from Keyence, a 3D scanner manufacturer, handheld capture distance for typical objects sits in a 0.3–1.2 m band, with variance greater than ±0.2 m during a single pass introducing geometric warping along the drift axis (Keyence Best Practices).
Wall surfaces and tracking reliability. Matte finishes (roughly 85–95% diffuse reflectance) keep ARKit's feature detection stable. Glossy paint, mirrors, and large windows cause tracking loss because the sensor fails to anchor on stable visual landmarks. Pure-black walls fail too — they're feature-poor in the wavelengths the camera uses for SLAM 3D scanning tracking. Per technical guidance from Structure.io (the manufacturer of the Structure Sensor scanning hardware), the practical recommendation is matte mid-gray or off-white walls with intentional visual landmarks — framed prints, calibration targets, or textured panels every 3–4 ft along the capture-zone perimeter (Structure.io Best Practices).
Flooring. Hard, matte, non-reflective flooring outperforms polished hardwood or glazed tile. Sealed concrete, matte vinyl, and low-pile commercial carpet absorb the off-axis light that would otherwise reflect upward and create phantom geometry beneath the subject. This is the cheapest fix in the entire studio: a $60 roll of matte vinyl over a glossy floor solves a problem no software setting addresses.
Capture zones versus staging zones. Physically separate the capture area from staging, equipment storage, and post-processing workstations. Mark the capture footprint on the floor with gaffer tape. Cross-traffic during a 60–90 second capture pass — a colleague walking through frame, a cable being moved, a chair sliding — is the single most common source of tracking failure in shared studios. Studios that enforce a "no entry while red light is on" rule report dramatic reductions in re-scan rates after the first month.
Ergonomic positioning. A handheld scan pass averages 60–90 seconds. Operators doing 20+ scans per day develop wrist fatigue that quietly degrades steadiness, raising motion speed above the target threshold of about 0.5 m/sec and dropping frames. The fix is mechanical: a height-adjustable stool for seated work, a chest-mount or monopod for handheld stability, and a tripod plus turntable for stationary subjects. Operator distance gets marked on the floor, not memorized.
A 12×12 room with matte walls and indirect light will outperform a 20×20 space with reflective surfaces and spotlights. Studio quality is about eliminating variables, not maximizing square footage.
The unifying principle: every spatial decision either reduces variance or introduces it. There is no neutral choice. A glossy wall doesn't fail to help — it actively damages every scan that includes it in frame.
Lighting Strategy: How to Engineer Consistency Across Every Capture
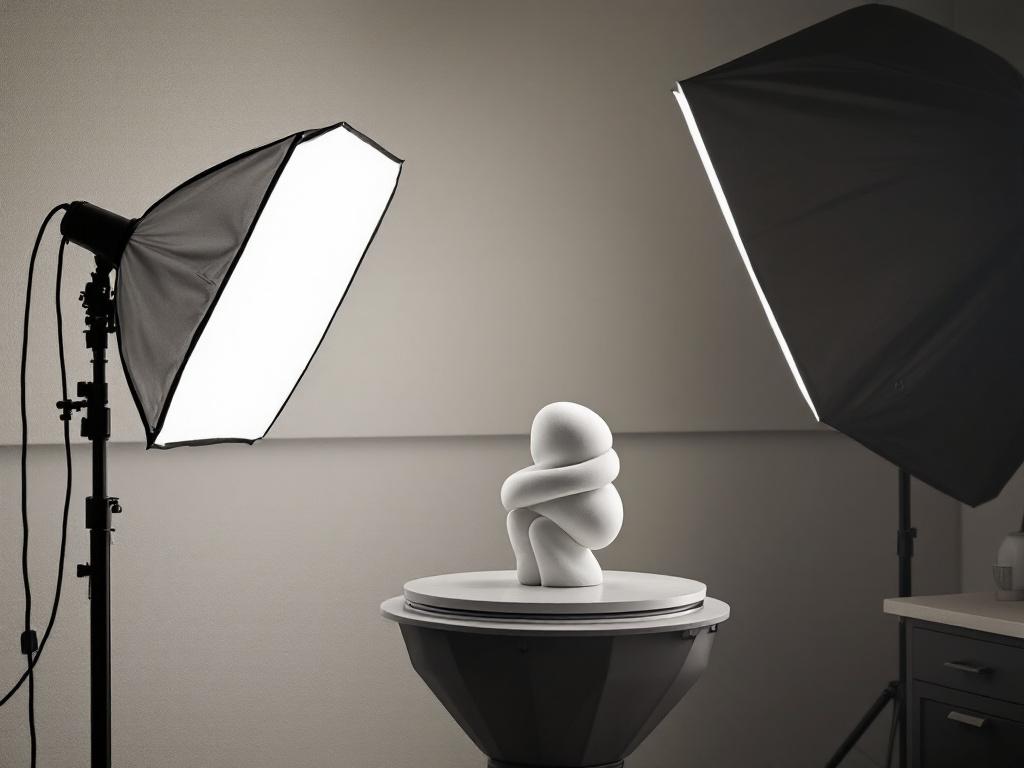
Lighting in a 3d scanning studio is not photographic lighting. The job is not drama, mood, or shadow sculpting. The job is reducing variance so the same subject scans identically on Tuesday morning and Friday afternoon. If your lighting setup looks like a fashion shoot, you're optimizing for the wrong outcome.
- Diffused key light at 5,000–6,500 K. Use a fabric softbox or large bounce panel at daylight-balanced color temperature. Direct LED panels and tungsten bulbs produce harsh shadows that confuse depth interpolation around concave geometry. Per technical guidance from Revopoint, a structured-light scanner manufacturer, daylight-balanced diffuse lighting is the consensus baseline for consistent capture (Revopoint Common Mistakes). Target ambient illumination of roughly 500–1,000 lux measured at the subject — bright enough for texture capture, diffuse enough to avoid specular interference.
- Fill light from the opposite vector. A second softbox or a white bounce card at 30–50% the key intensity, placed opposite the key. This eliminates the deep-shadow side that creates phantom mesh holes around concave geometry like chair backs, vase interiors, or the underside of a product handle. For LiDAR-only capture without texture export, fill is less critical. For textured mesh delivery, it's mandatory.
- Skip rim and edge lights unless scanning reflective objects. Rim lighting introduces specular highlights that some depth sensors interpret as geometry edges, producing thin floating artifacts at the silhouette. Reserve supplemental rim lighting only for matte-coated reflective subjects after dulling spray application — and even then, sparingly.
- Lock environmental lighting against drift. Blackout the windows. Disable any daylight-sensitive overhead fixtures. Standardize scan times if the studio receives any natural light. A scan that began at 2:00 PM and ended at 2:01 PM under a passing cloud will exhibit visible texture seams where the keyframe-baked colors don't match between frames. Vendor documentation from Keyence repeatedly emphasizes consistent, controlled illumination as the baseline condition for repeatable scans.
- Know when to skip supplemental light entirely. White or neutral-gray studio walls combined with a north-facing skylight or overcast ambient daylight can deliver sufficient diffuse illumination for LiDAR mesh capture. Photogrammetry pipelines need more light, more controlled. LiDAR pipelines often need less. Solo operators ship plenty of production work using only ambient daylight in a well-painted room — and they reinvest the lighting-rig budget into spatial design and a better workstation.
The technical reason lighting is simpler for LiDAR than for photogrammetry comes down to physics. LiDAR captures geometry from time-of-flight depth measurements at a specific wavelength, and the sensor is largely indifferent to scene illumination — the laser provides its own light, and the camera simply times the return. Texture baking, the second pass that maps RGB camera data onto the mesh, is where ambient lighting actually matters.
So the right question is not "is the geometry capture good under this light?" but "will the texture look identical across 200 product scans this month?" Studios that internalize this build minimal lighting rigs — a single softbox, a bounce card, blackout curtains — and skip the elaborate three-point setups borrowed from product photography. The savings get redirected into spatial design (matte walls, marked floor zones) and workflow tools (better monitors, calibrated viewers, dual-location backup). That redistribution is one of the highest-leverage decisions a new studio operator makes.
Hardware & Software Stack: Building the 3D Scanning Studio Toolchain
Tool choice cascades into every workflow decision downstream. A studio built on subscription desktop photogrammetry has different daily friction than one built on mobile on-device capture. The wrong choice doesn't fail loudly — it bleeds margin in 5-minute increments per scan, every day, until someone audits the spreadsheet six months in and realizes the subscription-plus-render-time math doesn't work.
The three dominant architectures break down as follows.
| Capability | Mobile On-Device | Desktop Photogrammetry | Hybrid Mobile + Cloud |
|---|---|---|---|
| Initial cost | Free–$50 | $500–$5,000/year | $200–$1,000/year |
| Subscription model | None | Annual or perpetual | Recurring required |
| Learning curve | < 1 day | 2–4 weeks | 1–2 weeks |
| Capture-to-export | 60–120 seconds | 30 min – 4 hours | 5–30 minutes |
| Internet dependency | None | None–partial | Required |
| Capability | Mobile On-Device | Desktop Photogrammetry | Hybrid Mobile + Cloud |
|---|---|---|---|
| Export formats | OBJ, USDZ, PLY, STL | OBJ, FBX, glTF | Variable, cloud-dependent |
| Texture baking | On-device, keyframe | Post-processed | Post-processed |
| Data residency | On-device | Local | Cloud (vendor-controlled) |
| Re-scan friction | Instant | Reprocess (hours) | Re-upload + reprocess |
| Daily volume ceiling | 50+ scans, no bottleneck | Render-queue limited | Bandwidth + quota limited |
For studios doing 10+ scans per day, the bottleneck stops being capture quality and becomes turnaround time. A desktop photogrammetry workflow that produces a 5% better mesh but takes 2 hours to reprocess loses every comparison to an on-device workflow that ships in 90 seconds. Per vendor documentation from 3d-scantech (a handheld scanner manufacturer), production-grade scanning workflows benchmark at 60–90 seconds per capture pass with 2–3 minutes of acceptance and export — meaning a sub-5-minute total cycle is achievable on mobile but structurally impossible on cloud-dependent stacks (3d-scantech Beginners Guide).
The polish-versus-speed trade-off deserves direct treatment. Photogrammetry suites do produce higher peak quality on hero assets — if you're shooting a museum artifact for archival purposes, a 30-camera rig and an overnight render will beat any handheld scan. But for production catalogs, e-commerce inventory, or as-built architectural documentation, that ceiling is irrelevant. The constraint is consistency at volume. Mobile on-device tools like Voxelio capture mesh, point cloud, pose+video, and MultiCam in one app — collapsing the tool-switching overhead that accumulates as a hidden cost in subscription stacks. For teams accelerating product development with 3D scanning, the cycle time delta compounds across hundreds of SKUs into weeks of recovered schedule.
Data residency and operational risk get less attention than they deserve. Cloud-dependent scanners create vendor lock-in that becomes painful when subscription prices rise, when the vendor pivots, or when client confidentiality requires fully on-device processing — architectural sites under NDA, proprietary product prototypes, government work with data-handling restrictions. On-device export also eliminates the upload-fail-and-re-upload tax that quietly kills throughput in studios with weak or unreliable connectivity. A 200 MB mesh file that fails to upload at the 92% mark is a 12-minute loss; experienced over a week, it's a half-day of billable time gone to network issues.
Speed matters more than polish in production studios. A re-scan costs less than a re-render — and a workflow with no cloud dependency never bottlenecks on someone else's server.

The Repeatable Capture Workflow: A 10-Step Process for Daily Scanning
Studio quality lives in procedure, not improvisation. The studios that ship 30 scans per day don't have better operators — they have a documented sequence that an operator on day three can execute as well as one on day three hundred. Every step below was added to someone's workflow because skipping it cost real money on a real project.
1. Pre-scan environment audit (60 seconds). Confirm lighting is on and stable, the capture footprint is clear of cross-traffic, the subject is staged, and the app is reset to the correct capture mode. Roughly four out of five scan failures in early-stage studios trace to environmental drift between sessions — a moved softbox, a left-open window, a chair pushed into the capture zone.
2. Subject preparation. Clean dust, fingerprints, and grease. Apply matte dulling spray to reflective or dark featureless surfaces (10–50 micron particle size, water-soluble). Per Revopoint's vendor guidance, reflective surfaces return invalid depth data and require either spray treatment or acceptance that this object is not a LiDAR candidate (Revopoint Common Mistakes).
3. Operator position lock. Stand at the marked floor position. For handheld capture, target 0.3–1.2 m distance from the subject and maintain ±0.2 m maximum drift across the pass. Distance variance during a single pass produces geometric warping that no post-processing recovers cleanly.
4. Capture mode selection. Choose Mesh, Point Cloud, Pose+Video, or MultiCam based on the deliverable. Mesh for textured AR and web. Point Cloud for CAD and research import. Pose+Video for NeRF and SLAM pipelines that need frame-accurate camera poses. Capturing in the wrong mode means re-scanning, not converting — there's no offline tool that reconstructs camera poses from a finished mesh.
5. First capture pass — primary geometry. Move slowly (under roughly 0.5 m/sec) in a continuous arc covering the subject's primary surfaces. Duration 60–90 seconds for a typical mid-sized object. Rushed motion drops frames and creates mesh holes that look minor in the viewfinder and catastrophic in the export.
6. Coverage verification on-device. Before stopping the capture, visually confirm that all critical surfaces show captured mesh — not gray or empty regions. Discovering a missing surface after export means a full re-scan, including the entire setup and operator-positioning sequence.
7. Immediate export with structured filename. Use the format [ProjectID]_[SubjectID]_[YYYYMMDD-HHMM]_[CaptureMode].ext. File naming is the difference between a searchable archive at scan #200 and a folder of Untitled_Scan_47_FINAL_v3.obj files no one can attribute to a project.
8. First-look validation. Open the export in a viewer — Apple Preview, MeshLab, AR Quick Look, or your delivery tool of choice. Confirm the model loads, the triangle count is reasonable for the deliverable (typically 50K–500K for product, 500K–5M for architectural), and there are no obvious holes in client-critical zones. As AI is transforming 3D scanning, automated mesh-quality assessment is becoming a viable layer in this step — but human eyes remain the final acceptance gate.
9. Dual-location storage. Save to local studio drive and cloud backup simultaneously. A single-location loss after a day of scanning is a recoverable disaster only if you have versioning. Studios that learn this lesson learn it once, expensively.
10. Accept, re-scan, or partial re-pass decision. Define the trigger explicitly. Missing critical geometry equals full re-scan. Minor texture seam equals partial re-pass. Aesthetic-only complaint with valid geometry equals accept and document. The decision tree gets posted on the studio wall, not stored in someone's head.
A documented process that takes 90 seconds per scan beats an optimized process that's different every time. Studios scale on repetition, not heroics.

Geometry and Texture Quality: Engineering Decisions That Eliminate Post-Processing
Every minute spent in post-processing is a minute that should have been a capture decision. Studios that scale push quality control upstream into the capture moment, not downstream into MeshLab cleanup. The math is simple: post-processing is human-time-bound and linear, while capture-time discipline is fixed-overhead and multiplicative across volume. Six technical decisions determine which side of that math your studio lands on.
Triangle count as a capture decision, not a post decision. Mesh decimation downstream — reducing 5M triangles to 200K — introduces shape error every time, because the decimation algorithm has to guess which features matter. Better to capture at the resolution the deliverable needs. Typical targets: 50K–200K triangles for e-commerce and AR, 200K–1M for architectural visualization, 1M+ for CAD reference. Capturing a 5M-triangle mesh for a USDZ product viewer that will display 80K is not "future-proofing" — it's storage tax with no upside.
Texture resolution versus file size. USDZ for Apple AR Quick Look caps practically at 2K–4K texture before file size starts hurting load times. Web glTF runs comfortably at 1K–2K. CAD reference often needs no texture at all — the engineer importing your scan into SolidWorks wants geometry, not surface color. Capturing at 4K when delivery is 1K wastes storage, bandwidth, and processing time on a benefit no one sees.
Point cloud density by use case. CAD import wants 1–5 mm point spacing. Visualization tolerates 2–10 mm. NeRF and research training data wants dense (sub-millimeter) where pose accuracy matters more than uniform spacing. The mistake is treating point cloud density as a quality metric in the abstract — denser is not better; denser is more bandwidth, slower import, and longer processing for downstream tools that don't need it.
Hard-failure surfaces and what to do instead. Glass, polished chrome, deep black, and featureless white surfaces are physical limits, not software bugs. The fixes: matte dulling spray (10–50 micron, water-soluble), temporary low-tack vinyl wrap, or accepting that this specific object requires photogrammetry instead of LiDAR. Per Revopoint's vendor documentation, surface preparation is the difference between a successful scan and a hole-riddled mesh on roughly the same hardware. The expensive mistake is trying three times with no spray before reaching for the can.
Export format matched to downstream tool. OBJ for legacy CAD and 3D printing pipelines (universal, no native compression). USDZ for the Apple AR ecosystem. PLY for point cloud research and colored point data. STL for fabrication (geometry only, no texture). glTF/GLB for web embedding with compression. Choosing wrong means a conversion step downstream that introduces error and consumes time the project schedule didn't allocate.
"Good enough" is discipline-specific. A real estate floor plan tolerates 2–3 cm error and ships fine. A reverse-engineering reference for a CNC tool path requires sub-millimeter. Don't apply CAD standards to AR product visualization or vice versa — both produce wasted effort. The first conversation with a new client is "what tolerance does your downstream process require?" — not "what scanner do you want us to use?"
Before any scan leaves the studio, validate against this 5-point check:
- Triangle count appropriate for delivery format (e-commerce 50K–200K; architectural 200K–1M; CAD 1M+)?
- Texture resolution matches the target viewer (USDZ 2K–4K; web glTF 1K–2K; CAD often none)?
- No mesh holes, floating geometry, or obvious artifacts in client-critical zones?
- File size appropriate for the delivery channel (under 25 MB for email; under 10 MB for web embed; under 100 MB for client portal)?
- Final export tested in target software (Apple AR Quick Look, SolidWorks, Blender, web viewer) before sign-off?
The five-point check takes about 90 seconds. The scan it catches before delivery saves a re-scan, a client conversation, and a hit to credibility. Across a year of production work, this is the highest-ROI procedural habit a studio adopts.
Eight Studio Mistakes That Kill Scan Quality — And the Fixes That Prevent Them
Most failures in 3D scanning studios are not novel. They are the same eight mistakes repeated by every studio in its first six months. Building guardrails against them on day one is dramatically cheaper than rediscovering them on day ninety, after the third client has asked why their scan looks different from last month's.
1. Featureless walls confuse ARKit tracking. Blank white walls deny the depth sensor the visual landmarks it needs to maintain spatial position across a scan pass. The result: drift, doubled geometry, or full tracking loss mid-capture. Fix: add textured panels, framed prints, or printed calibration targets every 3–4 ft along the capture-zone walls. Studios with sufficient feature density along the perimeter report tracking failure rates approaching zero on standard subjects.
2. Lighting that drifts during a single capture. A scan that started under afternoon sun and ended under cloud cover will exhibit visible texture seams where keyframe-baked colors don't match between frames. Fix: blackout the windows, lock fixture brightness with non-dimming drivers, and scan only after fixtures have warmed to stable color temperature (roughly 10 minutes for LED). The investment is one set of blackout curtains and a habit.
3. Inconsistent operator distance. Hand drift from 0.5 m to 1.0 m mid-pass produces geometry that warps along the drift axis — subtle enough to miss on the viewfinder, obvious in CAD import. Fix: floor markings for operator position, a height-adjustable monopod or chest-mount for handheld capture, or a fixed tripod with a turntable for stationary subjects. Mechanical constraints beat operator memory.
4. Skipping coverage verification before export. Discovering a missing critical surface after the client opens the file is a full re-scan plus a credibility loss that no apology email recovers. Fix: every operator runs the on-device coverage check and the first-look viewer validation in steps 6 and 8 of the workflow above. No scan ships without both. The procedure is non-negotiable; making exceptions is how exceptions become the norm.
5. "We'll fix it in post." The assumption that MeshLab, Blender, or ZBrush will rescue a bad capture is the single most expensive habit in production studios. Cleanup time per scan compounds across volume; capture-time discipline does not. Fix: cap the post-processing time budget at roughly 3 minutes per scan. Anything longer triggers a re-scan decision, not a longer cleanup session. The math favors re-capture almost every time.
6. No file naming convention or version control. At scan #50, the studio cannot find which capture is the current approved version, and at scan #200, no one remembers which client owns which folder. Fix: enforce [ProjectID]_[SubjectID]_[YYYYMMDD-HHMM]_[CaptureMode].ext from day one, with cloud backup running automatically. The naming convention is a 30-second decision that pays compounding returns for the life of the studio.
7. Wrong export format delivered to client. Sending USDZ when the engineer needs STL for SolidWorks. Delivering OBJ when the marketing team needs USDZ for Apple AR Quick Look. Each mismatch is a delay and an awkward email. Fix: confirm the deliverable format in writing before scheduling capture. Build a project-intake form that requires it. The format decision belongs in the kickoff call, not in the export menu thirty seconds before sending the file.
8. Scanning reflective or transparent objects without prep. Glass vases, polished chrome, glossy ceramics return invalid depth data and produce holes or phantom geometry. Per Revopoint's vendor guidance on common scanning mistakes, water-soluble matte dulling spray (10–50 micron) before capture, removed with a microfiber cloth after, is the standard production fix. The spray costs roughly $20 a can and rescues subjects that would otherwise require photogrammetry rigs an order of magnitude more expensive.
Start with the spatial audit from the first section of this guide: measure your room, assess your wall finishes, map your single biggest variable, and fix that one thing first. One variable mastered beats five half-measures attempted. The studios that ship reliable 3D assets daily didn't get there by buying better hardware — they got there by eliminating, in sequence, every environmental, procedural, and tooling source of variance until what remained was a process. Start the audit this week. Mark the floor tape next week. The hardware decision is the last one, not the first.